cooling FAQ
How Often To Clean Dryer Vents? Frequency, Tips, & Safety
Short Answer: The National Fire Protection Association recommends that you clean your dryer vents at least once a year to prevent fire hazards and maintain efficiency. If you have a large family or do frequent laundry, consider cleaning every 6 months.
The significance of dryer vent cleaning cannot be overstated, as it directly impacts fire safety, energy consumption, and the longevity of your appliance. We created this guide to explain the why, when, and how of keeping your dryer vents clear, offering a comprehensive guide to ensure your home remains safe and your dryer operates at peak efficiency.
From understanding the importance of this routine maintenance to exploring the signs that demand immediate attention, we will cover all you need to know about cleaning your dryer vents, whether you opt for a DIY approach or seek professional services.
Why Clean Your Dryer Vents?
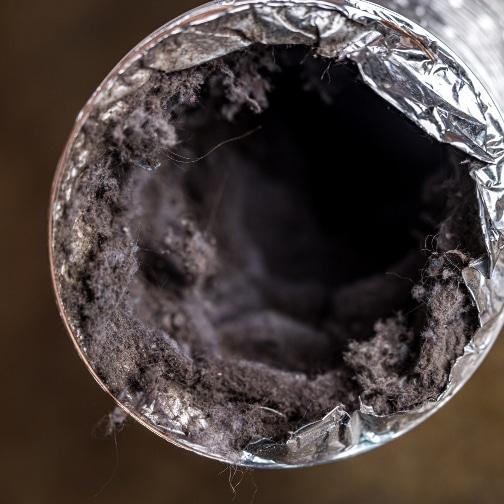
The necessity of cleaning your dryer vents transcends mere appliance care; it is a critical measure for home safety and efficiency. Each year, thousands of fires are attributed to lint buildup in dryer vents, leading to significant property damage and, tragically, loss of life.
The National Fire Protection Association highlights the stark reality that failure to clean dryer vents constitutes a leading factor in home clothes dryer fires. But the implications extend beyond the dire risk of fire.
Clogged dryer vents severely impede the efficiency of your appliance. A dryer burdened with a lint-filled vent must work harder and longer to dry clothes, leading to increased energy consumption and higher utility bills. This not only strains your household budget but also shortens the lifespan of your dryer, as the extra wear and tear hasten its demise.
Additionally, the buildup of lint and debris in dryer vents poses health risks. A clogged vent can lead to the backflow of exhaust gases into your home, compromising indoor air quality and presenting a hazard to occupants.
Benefits of Regular Dryer Vent Cleaning
- Prevention of Fire Hazards: Removing lint buildup significantly reduces the risk of dryer fires.
- Enhanced Efficiency: Clean vents allow your dryer to operate at optimal efficiency, drying clothes faster and lowering energy costs.
- Extended Appliance Life: Regular cleaning minimizes wear and tear on your dryer, prolonging its serviceable life.
- Improved Indoor Air Quality: Clear vents prevent exhaust gases and lint from infiltrating your living space, ensuring a healthier environment.
How Often Should Dryer Vents Be Cleaned?
The frequency of dryer vent cleaning hinges on several factors, including usage patterns and household characteristics. The baseline recommendation from fire safety experts and appliance manufacturers is at least once a year. However, this guideline is not one-size-fits-all; certain conditions may necessitate more frequent attention.
Factors Influencing Cleaning Frequency
- Usage Volume: Homes with higher laundry volumes—such as those with large families or newborns—may need to clean their vents every six months.
- Pet Ownership: Pet hair can significantly increase lint buildup, requiring more frequent cleanings for pet owners.
- Dryer Vent Length and Configuration: Longer vent hoses and those with curves or bends tend to accumulate lint more rapidly, potentially shortening the interval between cleanings.
- Type of Laundry: Frequent washing of heavier fabrics or items that shed a lot of lint (like towels and blankets) can lead to quicker lint accumulation.
Signs Your Dryer Vent Needs Cleaning
Identifying when your dryer vent needs cleaning is key to maintaining your dryer’s efficiency and ensuring home safety. Here are several indicators that it might be time to clean your dryer vent:
- Extended Drying Times: If it takes longer than usual to dry clothes, it could be a sign that the vent is clogged and unable to properly expel hot, moist air.
- Overly Hot Dryer and Clothes: A dryer that feels hot to the touch or clothes that are hotter than normal at the end of a cycle suggest poor airflow due to a blocked vent.
- Burning Smell: A clear red flag is the smell of burning lint, which could indicate that lint accumulation in the vent is getting heated to the point of potentially catching fire.
- Visible Lint and Debris Around the Vent Opening: If you notice lint or debris around the dryer vent opening outside your house, it’s a sign that the vent system is overloaded and ejecting material back out.
- Dryer Stops During a Cycle: Some dryers are equipped with a safety feature that automatically shuts off the dryer if it overheats, which can happen when vents are clogged.
DIY Dryer Vent Cleaning Guide
Cleaning your dryer vent is a straightforward process that can significantly reduce the risk of fire in your home, increase your dryer’s efficiency, and extend its lifespan. Here’s a comprehensive guide to help you tackle this task safely and effectively, combining insights from our top sources.
Preparation and Safety
Before you begin, ensure your dryer is turned off and unplugged. If you have a gas dryer, also turn off the gas supply to prevent leaks. Gather necessary tools such as a vacuum with a hose attachment, screwdriver, dryer vent cleaning brush kit, and protective gloves. Clear the area around your dryer to provide ample working space.
Step 1: Clean the Lint Trap
Start by removing the lint trap and cleaning it thoroughly. Use a vacuum to remove any lint that’s accumulated inside the cavity where the lint trap is housed. For stubborn lint, use a lint brush to gently scrub the mesh. This step prevents excess lint from being pushed into the vent system during the cleaning process.
Step 2: Disconnect the Dryer Vent Hose
Carefully move the dryer away from the wall to access the vent hose. Use a screwdriver to loosen the clamps that hold the vent hose to the dryer and the wall vent. Inspect the hose for wear or damage, and consider replacing it if necessary. If your vent runs vertically, or if it’s longer than a few feet, this step is crucial for thorough cleaning.
Step 3: Clean the Vent Hose and Duct
With the hose disconnected, use a dryer vent brush to clean inside the hose and duct. Insert the brush into the hose and ductwork, gently moving it back and forth. You may need to use a vacuum with a hose attachment to remove loosened lint. If your vent system is long or has multiple bends, consider using a brush attached to a drill for more effective cleaning. Ensure to clean from both the inside and outside ends of the vent system to remove all the lint.
Step 4: Reattach and Test
Once everything is clean, reattach the vent hose to the dryer and the wall vent, securing it with the clamps. Plug in your dryer (and turn the gas supply back on if you have a gas dryer), and push the dryer back to its original position. Run the dryer on a short cycle without any clothes to blow out any remaining dust and to ensure there are no leaks in the vent system.
Tips for Maintenance
- Regularly clean the lint trap before or after each load of laundry.
- Inspect and clean the vent hose and duct annually, or more frequently if you notice your dryer taking longer to dry clothes.
- Consider installing a dryer vent alarm that alerts you to potential airflow restrictions in your dryer vent system.
Preventative Maintenance and Tips
Maintaining your dryer vent not only extends the lifespan of your dryer but also keeps your energy bills lower and your home safer. Here are some preventative maintenance tips and strategies to reduce lint buildup:
Regular Lint Screen Cleaning
After every load of laundry, remove and clean the lint screen. This simple act can significantly reduce the risk of lint buildup in the vent. For a thorough clean, occasionally wash the lint screen with warm soapy water, especially if you use dryer sheets, which can leave a residue that reduces airflow.
Proper Dryer Use and Load Size
Avoid overloading your dryer. Larger loads can restrict airflow, leading to increased lint buildup. Additionally, sort your laundry and dry similar types of fabrics together to optimize drying times and efficiency. Heavy fabrics like towels and bedding should be dried separately from lighter clothing.
Upgrade Vent Materials
If your dryer vent hose is made of flexible foil or plastic, consider upgrading to a rigid or semi-rigid metal vent. These materials are not only more durable but also less susceptible to kinking and crushing, which can obstruct airflow and increase lint buildup risk.
Monitor Dryer Efficiency
Pay attention to drying times. If clothes are taking longer to dry, or if the dryer is running hotter than usual, these could be signs of vent blockages. Addressing these issues promptly can prevent more significant problems down the line.
The Professional Advantage
While DIY cleaning is effective for routine maintenance, there are situations where hiring a professional might be the best choice:
Thorough Cleaning
Professional vent cleaners have specialized tools and expertise to thoroughly clean vents, especially those that are long, have multiple turns, or are difficult to access. They can also inspect for potential issues, such as vents that are improperly installed or damaged.
Safety and Efficiency
A professional cleaning ensures that your dryer vent is as clear of lint and debris as possible, reducing the risk of fire and improving dryer efficiency. Professionals can also recommend improvements to your venting system that can enhance safety and performance.
When to Hire a Professional
Consider professional cleaning if:
- Your dryer vent is long or has several bends.
- You haven’t cleaned the vent in over a year.
- You notice significant drying time increases despite regular cleaning.
- Your vent system was installed such that parts of it are not easily accessible for cleaning.
Recognizing the Signs of a Clogged Dryer Vent
Being vigilant about the signs of a clogged dryer vent can help you act promptly, preventing potential hazards and maintaining the efficiency of your dryer. Here are key indicators that your dryer vent may need attention:
Increased Drying Time
If it’s taking longer than usual to dry clothes, this is often the first sign of a vent blockage. When airflow is restricted, your dryer has to work harder and longer to dry clothes, which can also lead to increased wear and tear on the appliance.
Overheating
If the dryer feels hotter than usual to the touch or if clothes are exceptionally hot at the end of a cycle, this could indicate that the vent is not expelling hot air efficiently. Overheating can pose a fire risk and damage fabrics.
Visible Lint and Debris Outside the Vent Opening
Check the exterior vent opening regularly. If you see lint accumulation around the vent or debris such as bird nests blocking the flow, it’s time for a thorough cleaning.
Unusual Odors
A musty smell or a burning odor coming from your dryer is a clear indication that lint or debris may be blocking the vent and possibly overheating, which could ignite the lint.
Final Thoughts
The task of cleaning dryer vents might seem daunting or easy to overlook amid the bustle of daily life. However, as we’ve explored, regular maintenance is crucial not only for the efficiency and longevity of your dryer but, more importantly, for the safety of your home.
Whether you choose to undertake this task yourself or enlist the services of a professional, keeping your dryer vents clean is a non-negotiable aspect of home maintenance.
Adopting a proactive approach to dryer vent cleaning, guided by the signs of clogged vents and armed with preventative maintenance strategies, can safeguard against potential hazards. Remember, the goal is not merely to react to problems as they arise but to prevent them, ensuring your home remains a safe haven.